This month’s Homegrown featured designer and AIGA Member, Chris Davis. Chris is the Graphics Manager at Eagle Press. Part of Chris’ job is to examine files, determine if everything needed is provided to flow through the system with no issues. More often than not, he finds most printing problems can be avoided by proper file setup. Chris shared some common problems and how to avoid them during our lunch and learn series.
So what are the most common problems with the print files that Chris receives? Missing or corrupt fonts tops the list. If you are submitting a pdf file to your printer be sure to adjust the settings so that 100% of the characters are included in the font subset. You can find this under the Advanced Settings of Adobe Acrobat.

If you are submitting all native files for an InDesign project, the Package feature will collect all fonts for you. Including fonts with your print project, will allow prepress to help correct minor typographical changes, such as a typo, without your having to re-submit files. Chris also advises to never rename fonts, as that could cause them to become corrupt.
Chris says the best way to ensure your files print correctly is to spend extra time prepping files and to communicate with your printer as often as needed about the project. You should always provide clear and detailed information about the print job when submitting the files. Even if you have spoken with your printer. Many printers are brokers who contract with a network of vendors to complete the job. Because of this tracking the progression of files can get tricky. Include as many details as possible, including: paper type, CMYK values, spot color values, quantity, and any specialty printing, such as die cut, foil, or thermography. It is ideal to include all files that makeup the print job, use InDesign’s Package feature to collect all files and fonts.
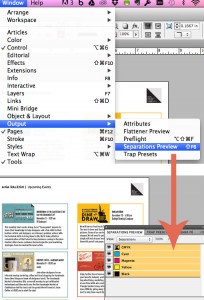
Colors and swatches are another common problem that Chris encounters. Delete any unused swatches from your files, as they could result in extra plates getting made. Don’t mix swatch types and use the correct swatch book for the type of paper you intend the project to be printed on. Coated and uncoated stock interact different with the ink. Use the Separations Preview tool to check your swatches are correct.
Also, be sure images are CMYK. If images are left in RGB their color values are compromised. Don’t link to photoshop files to avoid corruption and processing issues.
Missing links are another common problem. If you have packaged your files in InDesign, it’s easy to collect all links. But of course it always good to double check all the links are included. If submitting an Illustrator file with links, make sure you embed the links into the file. Should prepress need to open the file to make a change they will have the necessary links to do so, ensuring the print process does not slow down.
Chris mentioned FlightCheck, a preflight application that checks your files for print quality and can collect required print elements.
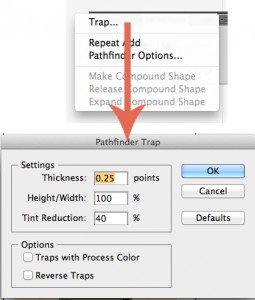
Trapping and registration errors are another issue Chris deals with. Chris recommends trapping your own files to help avoid registration issues. If text needs trapping, create outlines first. In Illustrator, you can find the trap tool under the Pathfinder panel menu.
Oversized placed files can slow down the RIP process, so Chris advises to size your images to fit the design to avoid images shifting or enlarging or reducing too much. When you place the full size image, it gets processed twice during the RIP process. It gets processed at it’s full size and then again at the reduced size. Longer processing time could cause a crash and result in a plate not getting printed.
Clipping masks can also cause problems. If you have a clipping mask applied to an image that extends past the bleed, the portion extending past the bleed will get processed too. So trim all clipping masks to be in line with your bleed. Also, avoid using a clipping mask to hide larger portions of a file, for example a file with multiple logo versions on it. Create a file with only the part you need. You can check for files like these in by viewing the file in outline mode.
Another big offender in causing RIP problems are gradients and transparencies. When using them, make sure you rasterize them using the Flattener Preview tool, using the high resolution setting. When screening less than 10% ask your printer to use a high LPI, like 175.
Two last bits of advice from Chris are to visit your printer, see their operation and how they work, and always prep your files and do a preflight check no matter how it is getting printed. Whether offset or digital, the files will always go through the RIP process.
Thanks so much Chris for sharing your expertise with us. I know I learned a lot and will be revising my preflight and design processes.